NexScript Smart Contract Tutorial Guide
Overview
This guide walks you through creating, deploying, and interacting with a TransferWithTimeout smart contract on the Nexa blockchain using the NexScript Playground. You'll learn how to compile contracts, deploy them, fund them, and execute both transfer and timeout functions.
Getting Started: Navigate to NexScript Playground
Step 1: Access the Playground

- Go to the NexScript Playground at https://playground.nexscript.org/
- Navigate to the Edit page
- The
TransferWithTimeoutcontract should already be loaded by default in the editor
Step 2: Verify And Compile Contract Code
Ensure the contract code matches the following NexScript implementation:
pragma nexscript >= 0.8.0;

contract TransferWithTimeout(pubkey sender, pubkey recipient, int timeout) {
    // Require recipient's signature to match
    function transfer(sig recipientSig) {
        require(checkSig(recipientSig, recipient));
    }

    // Require timeout time to be reached and sender's signature to match
    function timeout(sig senderSig) {
        require(checkSig(senderSig, sender));
        require(tx.time >= timeout);
    }
}
- In the NexScript playground, click "Compile" at the bottom of the edit box
- This compiles the NexScript code into a NexScript .json artifact
- The compiled contract artifact will be displayed in the right window
- Click 'Load Artifact' to expand and inspect its content
Contract Artifact
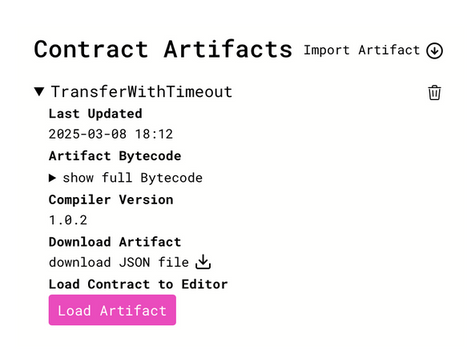
Important Note: The NexScript artifact represents a compiled contract containing all information needed to interact with smart contracts. Artifacts are .json files that can be shared and used later without recompiling.
Setting Up Wallets
Understanding Sender and Recipient Roles
Sender Wallet: The sender initiates the cryptocurrency gift or tip (e.g., a café customer wanting to tip a barista). The sender is responsible for:
- Creating and funding the smart contract with Nexa coins
- Deploying it to the blockchain
- Specifying the recipient's public key and timeout period
- Preparing the paper tip by printing the recipient's private key (or QR code) with instructions
- Can reclaim funds if the recipient fails to claim before timeout
Recipient Wallet: The recipient receives the cryptocurrency gift or tip (e.g., a barista receiving a tip). The recipient:
- Receives a physical piece of paper containing their private key (or QR code) and instructions
- Uses the private key to sign a transaction calling the contract's transfer function
- Must act before the timeout period or the sender can reclaim the funds
Step 4: Create Wallets
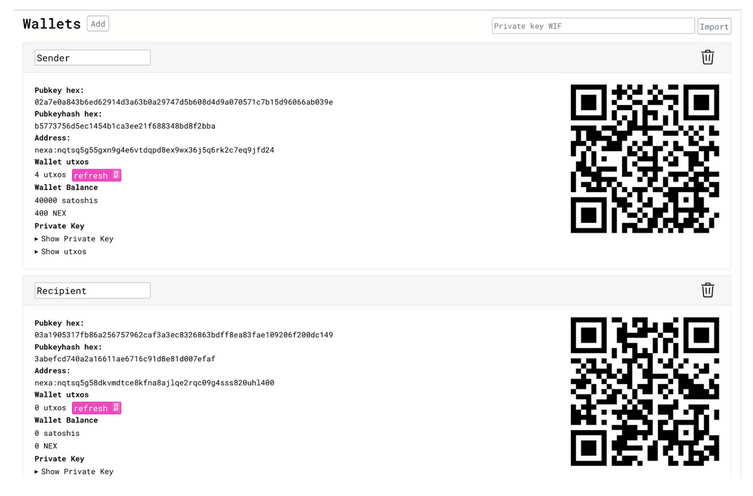
- Navigate to the Wallets page in the NexScript Playground
- Label the default wallet as "Sender"
- Click the "Add" button to create a second wallet
- Label the second wallet as "Recipient"
Both wallets will display:
- Public key hex
- Public key hash
- Address
- Wallet balance
- QR codes for easy sharing
Deploying Your Contract
Step 5: Deploy TransferWithTimeout Contract
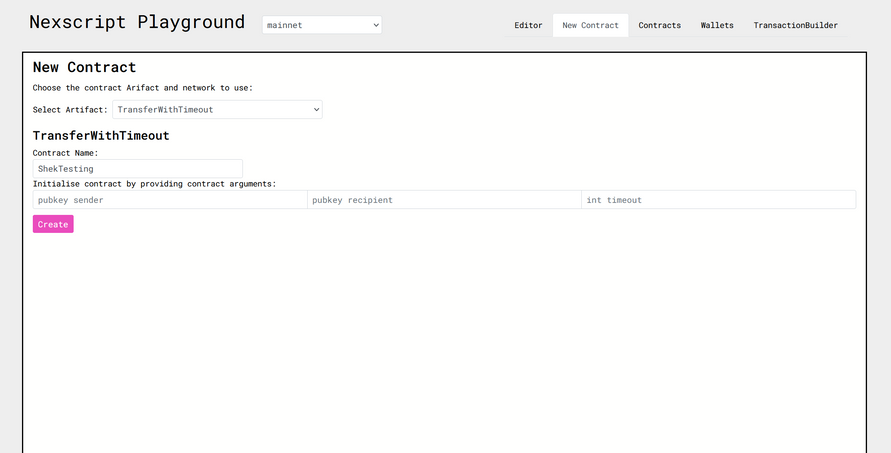
- Navigate to the New Contract page in the NexScript Playground
- Select the TransferWithTimeout artifact from the dropdown
- Set the contract name to something unique like
MyFirstContractor your name - Configure the constructor arguments:
- Sender public key: Copy from the Sender wallet
- Recipient public key: Copy from the Recipient wallet
- Int timeout: Set to
41,000
Step 6: Input Public Keys
- Go to the Wallets page
- Click the sender wallet's public key hex to copy it
- Navigate back to New Contract page
- Paste the sender's public key into the pubkey sender field
- Return to Wallets page and copy the recipient's public key hex
- Navigate back to New Contract and paste into the pubkey recipient field
Step 7: Create the Contract
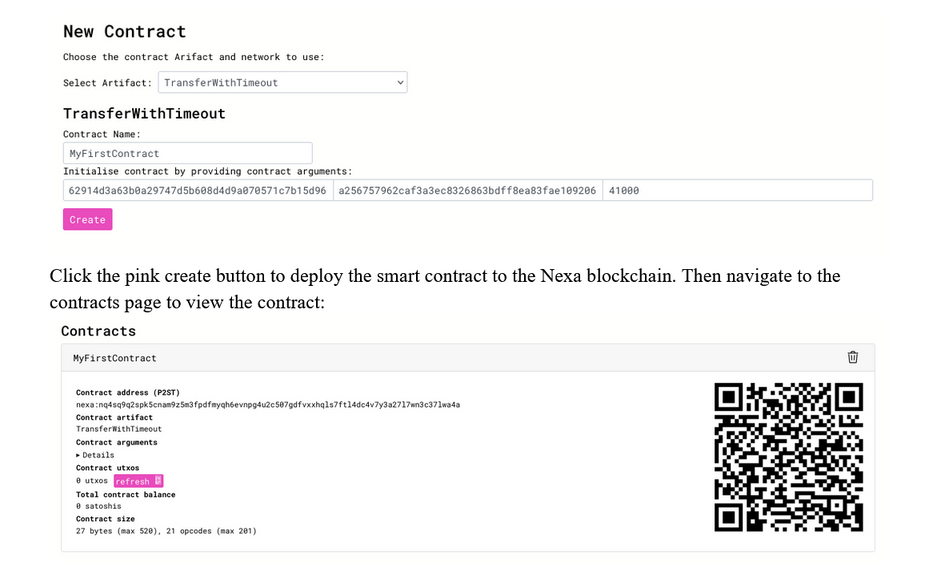
- Click the pink "Create" button to deploy the smart contract to the Nexa blockchain
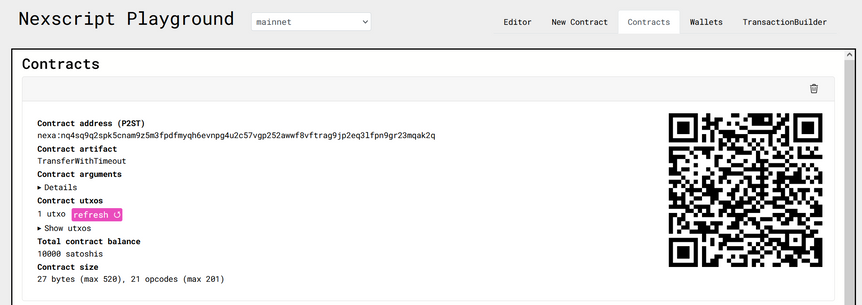
- Navigate to the Contracts page to view your deployed contract
- Note the contract's Nexa address for funding
Optional Verification: Copy the contract's Nexa address and search for it on the Nexa Explorer at https://explorer.nexa.org/ to verify deployment.
Funding and Interacting with the Smart Contract
Step 8: Fund the Smart Contract
The sender must fund the smart contract as it acts as a secure escrow for Nexa coins. The contract will hold funds until either:
- The recipient claims them, or
- The sender reclaims them after the timeout period expires
Funding Process:
- Copy the contract address from the Contracts page in the NexScript Playground
- Open the Nexa faucet at http://173.249.37.34:7997/faucet
- Scroll down to the Direct Address funding input
- Enter the contract's address
- Click the Send Funds button
- Return to the NexScript Playground and click the pink refresh button to verify funding
Step 9: Execute Transfer Function (Recipient Claims Funds)
- Open the TransactionBuilder page
- Select
MyFirstContractfrom the dropdown menu - Set the recipient's wallet as the
sig recipientSigargument - Navigate to the Wallets page and copy the recipient's Nexa address
- Return to TransactionBuilder and configure:
- Paste the recipient's address as Output #0's receiver
- Set 1000 satoshi (10 NEX) as the transfer amount
- Check the 'manual UTXO selection' box
- Select the contract's UTXO you're interacting with
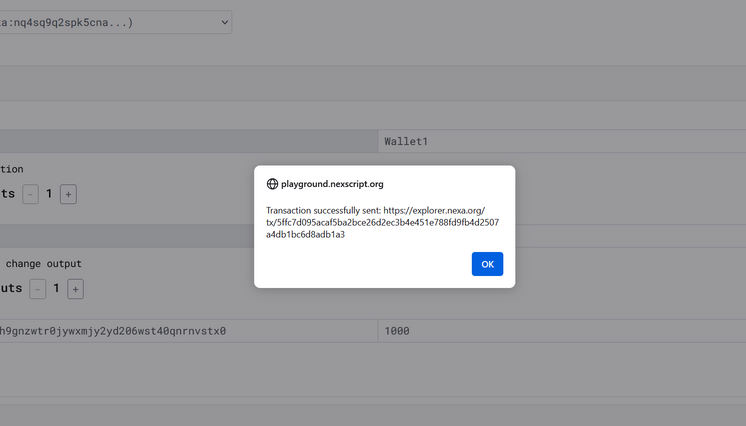
- Click the pink Send button to execute the transfer
- A success alert will appear with a link to the transaction in Nexa Explorer
Reclaiming Funds Using the Timeout Function
Step 10: Sender Reclaims Funds After Timeout

- Open TransactionBuilder and select
MyFirstContract - Set the sender wallet as the
sig senderSigargument - Navigate to Wallets and copy the sender's Nexa address
- Return to TransactionBuilder and configure:
- Paste the sender's address in Output #0 (receiver's address)
- Set the amount to 4200 satoshi (42 NEX)
- Select manual UTXO and choose the contract's UTXO
- Click the pink Send button to execute the transaction
- Wait for the success popup with the transaction link
- Go to Wallets and click the pink refresh button on the sender's wallet
- Verify that the 42 NEX has been successfully returned
Demonstrating Locktime Errors
Step 11: Producing 'Locktime Not Satisfied' Error
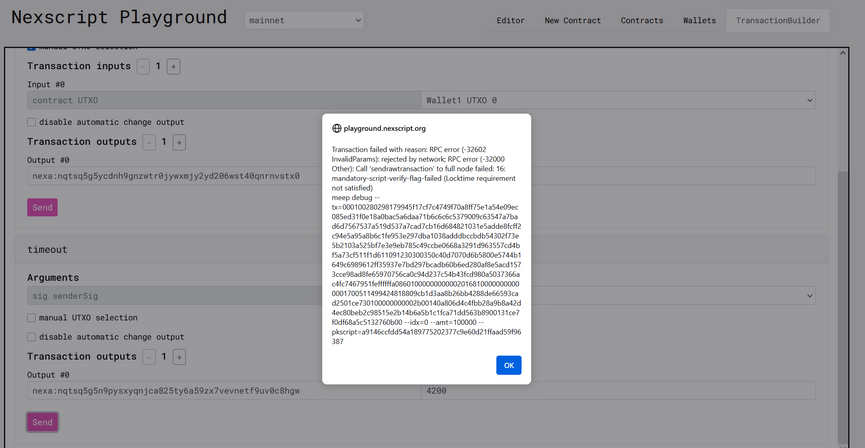
To demonstrate how the timeout mechanism works, you can intentionally create a scenario where the timeout hasn't been reached:
- Compile a new contract from the editor following the same steps as before
- However, set the
int timeoutto900,000instead of41,000 - Deploy and fund this new contract
- In the transaction builder, attempt to reclaim funds to the sender's public key
- Since the current block height hasn't reached 900,000, you'll receive a "Locktime Not Satisfied" error
This demonstrates that the timeout mechanism properly prevents premature fund recovery, ensuring the recipient has the specified time window to claim their funds.
Key Concepts Summary
Contract Functions
- transfer(): Allows the recipient to claim funds using their signature
- timeout(): Allows the sender to reclaim funds after the timeout period expires
Security Features
- Signature verification: Ensures only authorized parties can execute functions
- Block height validation: Uses blockchain time to enforce timeout periods
Troubleshooting
Common Issues
- Locktime errors: Ensure the timeout period has been reached for sender reclaim
- Signature errors: Verify you're using the correct wallet for the respective function
- UTXO selection: Make sure to select the correct contract UTXO in manual selection mode
- Address formatting: Double-check that copied addresses are complete and accurate
Best Practices
- Always verify contract deployment on the Nexa Explorer
- Refresh wallet balances after transactions to confirm success